590 lines
22 KiB
Markdown
590 lines
22 KiB
Markdown
|
|
# 
|
||
|
|
|
||
|
|
[](https://ci.appveyor.com/project/ravibpatel/autoupdater-net)
|
||
|
|
|
||
|
|
AutoUpdater.NET is a class library that allows .NET developers to easily add auto update functionality to their classic
|
||
|
|
desktop application projects.
|
||
|
|
|
||
|
|
## The NuGet Package [](https://www.nuget.org/packages/Autoupdater.NET.Official/) [](https://www.nuget.org/packages/Autoupdater.NET.Official/)
|
||
|
|
|
||
|
|
````powershell
|
||
|
|
PM> Install-Package Autoupdater.NET.Official
|
||
|
|
````
|
||
|
|
|
||
|
|
## Supported .NET versions
|
||
|
|
|
||
|
|
* .NET Framework 4.6.2 or above
|
||
|
|
* .NET Core 3.1
|
||
|
|
* .NET 5.0 or above
|
||
|
|
|
||
|
|
## Supported Windows versions
|
||
|
|
|
||
|
|
* Windows 8 or above
|
||
|
|
* Windows version lower than 8 requires .NET Framework 4.5 or above installed for ZipExtractor to work. You can use
|
||
|
|
installer instead of zip file as an update file to avoid this issue.
|
||
|
|
|
||
|
|
This library only works for WinForms or WPF application projects.
|
||
|
|
|
||
|
|
## How it works
|
||
|
|
|
||
|
|
AutoUpdater.NET downloads the XML file containing update information from your server. It uses this XML file to get the
|
||
|
|
information about the latest version of the software. If the latest version of the software is greater than the current
|
||
|
|
version of the software installed on User's PC then AutoUpdater.NET shows update dialog to the user. If user press the
|
||
|
|
update button to update the software then It downloads the update file (Installer) from URL provided in XML file and
|
||
|
|
executes the installer file it just downloaded. It is a job of installer after this point to carry out the update. If
|
||
|
|
you provide zip file URL instead of installer then AutoUpdater.NET will extract the contents of zip file to application
|
||
|
|
directory.
|
||
|
|
|
||
|
|
## Using the code
|
||
|
|
|
||
|
|
### XML file
|
||
|
|
|
||
|
|
AutoUpdater.NET uses XML file located on a server to get the release information about the latest version of the
|
||
|
|
software. You need to create XML file like below and then you need to upload it to your server.
|
||
|
|
|
||
|
|
````xml
|
||
|
|
<?xml version="1.0" encoding="UTF-8"?>
|
||
|
|
<item>
|
||
|
|
<version>2.0.0.0</version>
|
||
|
|
<url>https://rbsoft.org/downloads/AutoUpdaterTest.zip</url>
|
||
|
|
<changelog>https://github.com/ravibpatel/AutoUpdater.NET/releases</changelog>
|
||
|
|
<mandatory>false</mandatory>
|
||
|
|
</item>
|
||
|
|
````
|
||
|
|
|
||
|
|
There are two things you need to provide in XML file as you can see above.
|
||
|
|
|
||
|
|
* version (Required) : You need to provide latest version of the application between version tags. Version should be in
|
||
|
|
X.X.X.X format.
|
||
|
|
* url (Required): You need to provide URL of the latest version installer file or zip file between url tags.
|
||
|
|
AutoUpdater.NET downloads the file provided here and install it when user press the Update button.
|
||
|
|
* changelog (Optional): You need to provide URL of the change log of your application between changelog tags. If you
|
||
|
|
don't provide the URL of the changelog then update dialog won't show the change log.
|
||
|
|
* mandatory (Optional): You can set this to true if you don't want user to skip this version. This will ignore Remind
|
||
|
|
Later and Skip options and hide both Skip and Remind Later button on update dialog.
|
||
|
|
* mode (Attribute, Optional): You can provide mode attribute on mandatory element to change the behaviour of the
|
||
|
|
mandatory flag. If you provide "1" as the value of mode attribute then it will also hide the Close button on
|
||
|
|
update dialog. If you provide "2" as the value of mode attribute then it will skip the update dialog and start
|
||
|
|
downloading and updating application automatically.
|
||
|
|
|
||
|
|
````xml
|
||
|
|
<mandatory mode="2">true</mandatory>
|
||
|
|
````
|
||
|
|
|
||
|
|
* minVersion (Attribute, Optional): You can also provide minVersion attribute on mandatory element. When you provide
|
||
|
|
it, Mandatory option will be triggered only if the installed version of the app is less than the minimum version
|
||
|
|
you specified here.
|
||
|
|
|
||
|
|
````xml
|
||
|
|
<mandatory minVersion="1.2.0.0">true</mandatory>
|
||
|
|
````
|
||
|
|
|
||
|
|
* executable (Optional): You can provide the path of the executable if it was changed in the update. It should be
|
||
|
|
relative to the installation directory of the application. For example, if the new executable is located inside the
|
||
|
|
bin folder of the installation directory, then you should provide it as shown below.
|
||
|
|
|
||
|
|
````xml
|
||
|
|
<executable>bin\AutoUpdaterTest.exe</executable>
|
||
|
|
````
|
||
|
|
|
||
|
|
* args (Optional): You can provide command line arguments for Installer between this tag. You can include %path% with
|
||
|
|
your command line arguments, it will be replaced by path of the directory where currently executing application
|
||
|
|
resides.
|
||
|
|
* checksum (Optional): You can provide the checksum for the update file between this tag. If you do this AutoUpdater.NET
|
||
|
|
will compare the checksum of the downloaded file before executing the update process to check the integrity of the
|
||
|
|
file. You can provide algorithm attribute in the checksum tag to specify which algorithm should be used to generate
|
||
|
|
the checksum of the downloaded file. Currently, MD5, SHA1, SHA256, SHA384, and SHA512 are supported.
|
||
|
|
|
||
|
|
````xml
|
||
|
|
<checksum algorithm="MD5">Update file Checksum</checksum>
|
||
|
|
````
|
||
|
|
|
||
|
|
You can also use the XML creator tool created by one of the user to create the XML file. You can download it
|
||
|
|
from [here](https://github.com/DwainSnickles/AutoUpdater.NET.XML-Creator-master/blob/master/AutoUpdaterXML.zip).
|
||
|
|
|
||
|
|
### Adding one line to make it work
|
||
|
|
|
||
|
|
After you done creating and uploading XML file, It is very easy to add a auto update functionality to your application.
|
||
|
|
First you need to add following line at the top of your form.
|
||
|
|
|
||
|
|
````csharp
|
||
|
|
using AutoUpdaterDotNET;
|
||
|
|
````
|
||
|
|
|
||
|
|
Now you just need to add following line to your main form constructor or in Form_Load event. You can add this line
|
||
|
|
anywhere you like. If you don't like to check for update when application starts then you can create a Check for update
|
||
|
|
button and add this line to Button_Click event.
|
||
|
|
|
||
|
|
````csharp
|
||
|
|
AutoUpdater.Start("https://rbsoft.org/updates/AutoUpdaterTest.xml");
|
||
|
|
````
|
||
|
|
|
||
|
|
Start method of AutoUpdater class takes URL of the XML file you uploaded to server as a parameter.
|
||
|
|
|
||
|
|
> AutoUpdater.Start should be called from UI thread.
|
||
|
|
|
||
|
|
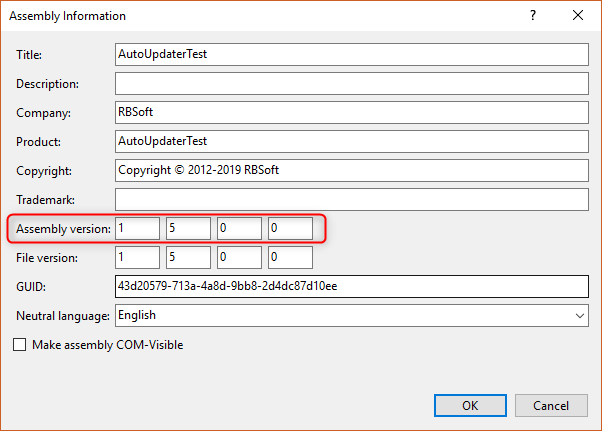
### Current version detection
|
||
|
|
|
||
|
|
AutoUpdater.NET uses Assembly version to determine the current version of the application. You can update it by going to
|
||
|
|
Properties of the project as shown in following screenshot.
|
||
|
|
|
||
|
|
|
||
|
|
|
||
|
|
Version specified in XML file should be higher than Assembly version to trigger the update.
|
||
|
|
|
||
|
|
If you want to provide your own Assembly then you can do it by providing second argument of Start method as shown below.
|
||
|
|
|
||
|
|
````csharp
|
||
|
|
AutoUpdater.Start("https://rbsoft.org/updates/AutoUpdaterTest.xml", myAssembly);
|
||
|
|
````
|
||
|
|
|
||
|
|
## Configuration Options
|
||
|
|
|
||
|
|
### Provide installed version manually
|
||
|
|
|
||
|
|
If you don't want AutoUpdater.NET to determine the installed version from assembly then you can provide your own version
|
||
|
|
by assigning it to InstalledVersion field as shown below.
|
||
|
|
|
||
|
|
````csharp
|
||
|
|
AutoUpdater.InstalledVersion = new Version("1.2");
|
||
|
|
````
|
||
|
|
|
||
|
|
### Download Update file and XML using FTP
|
||
|
|
|
||
|
|
If you like to use ftp XML URL to check for updates or download the update file then you can provide you FTP credentials
|
||
|
|
in alternative Start method as shown below.
|
||
|
|
|
||
|
|
````csharp
|
||
|
|
AutoUpdater.Start("ftp://rbsoft.org/updates/AutoUpdaterTest.xml", new NetworkCredential("FtpUserName", "FtpPassword"));
|
||
|
|
````
|
||
|
|
|
||
|
|
If you are using FTP download URL in the XML file then credentials provided here will be used to authenticate the
|
||
|
|
request.
|
||
|
|
|
||
|
|
### Check for updates synchronously
|
||
|
|
|
||
|
|
If you want to check for updates synchronously then set Synchronous to true before starting the update as shown below.
|
||
|
|
|
||
|
|
````csharp
|
||
|
|
AutoUpdater.Synchronous = true;
|
||
|
|
````
|
||
|
|
|
||
|
|
### Disable Skip Button
|
||
|
|
|
||
|
|
If you don't want to show Skip button on Update form then just add following line with above code.
|
||
|
|
|
||
|
|
````csharp
|
||
|
|
AutoUpdater.ShowSkipButton = false;
|
||
|
|
````
|
||
|
|
|
||
|
|
### Disable Remind Later Button
|
||
|
|
|
||
|
|
If you don't want to show Remind Later button on Update form then just add following line with above code.
|
||
|
|
|
||
|
|
````csharp
|
||
|
|
AutoUpdater.ShowRemindLaterButton = false;
|
||
|
|
````
|
||
|
|
|
||
|
|
### Ignore previous Remind Later or Skip settings
|
||
|
|
|
||
|
|
If you want to ignore previously set Remind Later and Skip settings then you can set Mandatory property to true. It will
|
||
|
|
also hide Skip and Remind Later button. If you set Mandatory to true in code then value of Mandatory in your XML file
|
||
|
|
will be ignored.
|
||
|
|
|
||
|
|
````csharp
|
||
|
|
AutoUpdater.Mandatory = true;
|
||
|
|
````
|
||
|
|
|
||
|
|
### Forced updates
|
||
|
|
|
||
|
|
You can enable forced updates by setting Mandatory property to true and setting UpdateMode to value of `Mode.Forced`
|
||
|
|
or `Mode.ForcedDownload`. `Mode.Forced` option will hide Remind Later, Skip and Close buttons on the standard update
|
||
|
|
dialog. `Mode.ForcedDownload` option will skip the standard update dialog and start downloading and updating the
|
||
|
|
application without user interaction. `Mode.ForceDownload` option will also ignore value of OpenDownloadPage flag.
|
||
|
|
|
||
|
|
````csharp
|
||
|
|
AutoUpdater.Mandatory = true;
|
||
|
|
AutoUpdater.UpdateMode = Mode.Forced;
|
||
|
|
````
|
||
|
|
|
||
|
|
### Basic Authentication
|
||
|
|
|
||
|
|
You can provide Basic Authentication for XML, Update file and Change Log as shown in below code.
|
||
|
|
|
||
|
|
````csharp
|
||
|
|
BasicAuthentication basicAuthentication = new BasicAuthentication("myUserName", "myPassword");
|
||
|
|
AutoUpdater.BasicAuthXML = AutoUpdater.BasicAuthDownload = AutoUpdater.BasicAuthChangeLog = basicAuthentication;
|
||
|
|
````
|
||
|
|
|
||
|
|
### Set User-Agent for http web requests
|
||
|
|
|
||
|
|
Set the User-Agent string to be used for HTTP web requests so you can differentiate them in your web server request
|
||
|
|
logs.
|
||
|
|
|
||
|
|
````csharp
|
||
|
|
AutoUpdater.HttpUserAgent = "AutoUpdater";
|
||
|
|
````
|
||
|
|
|
||
|
|
### Enable Error Reporting
|
||
|
|
|
||
|
|
You can turn on error reporting by adding below code. If you do this AutoUpdater.NET will show error message, if there
|
||
|
|
is no update available or if it can't get to the XML file from web server.
|
||
|
|
|
||
|
|
````csharp
|
||
|
|
AutoUpdater.ReportErrors = true;
|
||
|
|
````
|
||
|
|
|
||
|
|
### Run update process without Administrator privileges
|
||
|
|
|
||
|
|
If your application doesn't need administrator privileges to replace old version then you can set RunUpdateAsAdmin to
|
||
|
|
false.
|
||
|
|
|
||
|
|
````csharp
|
||
|
|
AutoUpdater.RunUpdateAsAdmin = false;
|
||
|
|
````
|
||
|
|
|
||
|
|
### Open Download Page
|
||
|
|
|
||
|
|
If you don't want to download the latest version of the application and just want to open the URL between url tags of
|
||
|
|
your XML file then you need to add following line with above code.
|
||
|
|
|
||
|
|
````csharp
|
||
|
|
AutoUpdater.OpenDownloadPage = true;
|
||
|
|
````
|
||
|
|
|
||
|
|
This kind of scenario is useful if you want to show some information to users before they download the latest version of
|
||
|
|
an application.
|
||
|
|
|
||
|
|
### Remind Later
|
||
|
|
|
||
|
|
If you don't want users to select Remind Later time when they press the Remind Later button of update dialog then you
|
||
|
|
need to add following lines with above code.
|
||
|
|
|
||
|
|
````csharp
|
||
|
|
AutoUpdater.LetUserSelectRemindLater = false;
|
||
|
|
AutoUpdater.RemindLaterTimeSpan = RemindLaterFormat.Days;
|
||
|
|
AutoUpdater.RemindLaterAt = 2;
|
||
|
|
````
|
||
|
|
|
||
|
|
In above example when user press Remind Later button of update dialog, It will remind user for update after 2 days.
|
||
|
|
|
||
|
|
### Proxy Server
|
||
|
|
|
||
|
|
If your XML and Update file can only be used from certain Proxy Server then you can use following settings to tell
|
||
|
|
AutoUpdater.NET to use that proxy. Currently, if your Changelog URL is also restricted to Proxy server then you should
|
||
|
|
omit changelog tag from XML file cause it is not supported using Proxy Server.
|
||
|
|
|
||
|
|
````csharp
|
||
|
|
var proxy = new WebProxy("ProxyIP:ProxyPort", true)
|
||
|
|
{
|
||
|
|
Credentials = new NetworkCredential("ProxyUserName", "ProxyPassword")
|
||
|
|
};
|
||
|
|
AutoUpdater.Proxy = proxy;
|
||
|
|
````
|
||
|
|
|
||
|
|
### Specify where to download the update file
|
||
|
|
|
||
|
|
You can specify where you want to download the update file by assigning DownloadPath field as shown below. It will be
|
||
|
|
used for ZipExtractor too.
|
||
|
|
|
||
|
|
````csharp
|
||
|
|
AutoUpdater.DownloadPath = Application.StartupPath;
|
||
|
|
````
|
||
|
|
|
||
|
|
### Specify where to extract zip file containing updated files
|
||
|
|
|
||
|
|
If you are using a zip file as an update file then you can set the "InstallationPath" equal to the path where your app
|
||
|
|
is installed. This is only necessary when your installation directory differs from your executable path.
|
||
|
|
|
||
|
|
````csharp
|
||
|
|
var currentDirectory = new DirectoryInfo(Application.StartupPath);
|
||
|
|
if (currentDirectory.Parent != null)
|
||
|
|
{
|
||
|
|
AutoUpdater.InstallationPath = currentDirectory.Parent.FullName;
|
||
|
|
}
|
||
|
|
````
|
||
|
|
|
||
|
|
### Specify relative path to executable you want to execute after update
|
||
|
|
|
||
|
|
If you are using a zip file as an update file, then you can set "ExecutablePath" equal to a new executable path relative
|
||
|
|
to the installation directory. This is only necessary if your new executable path differs from current executable path.
|
||
|
|
The "executable" value defined in XML takes precedence over this value.
|
||
|
|
|
||
|
|
````csharp
|
||
|
|
AutoUpdater.ExecutablePath = "bin/AutoUpdater.exe";
|
||
|
|
````
|
||
|
|
|
||
|
|
### Clear application directory before extracting update file
|
||
|
|
|
||
|
|
Sometimes it is necessary to clear previous version files before doing an update. In this case, you can specify whether
|
||
|
|
to clear the application directory before extracting the update file using the below code.
|
||
|
|
|
||
|
|
````csharp
|
||
|
|
AutoUpdater.ClearAppDirectory = true;
|
||
|
|
````
|
||
|
|
|
||
|
|
### Specify size of the UpdateForm
|
||
|
|
|
||
|
|
You can specify the size of the update form by using below code.
|
||
|
|
|
||
|
|
````csharp
|
||
|
|
AutoUpdater.UpdateFormSize = new System.Drawing.Size(800, 600);
|
||
|
|
````
|
||
|
|
|
||
|
|
### Change Icon of the UpdateForm
|
||
|
|
|
||
|
|
You can change the icon of the update form by using below code. It assumes that you have an image resource named Icon in
|
||
|
|
your project. Size of icon file should be 64x64.
|
||
|
|
|
||
|
|
````csharp
|
||
|
|
AutoUpdater.Icon = Resources.Icon;
|
||
|
|
````
|
||
|
|
|
||
|
|
### Set the owner Form / Window
|
||
|
|
|
||
|
|
To ensure the dialogs showed by the auto updater are visible and always focussed correctly related to an application
|
||
|
|
Form or Window, it may be necessary to set an owner. You can assign a Form or WPF Window as the owner by following the
|
||
|
|
example below.
|
||
|
|
|
||
|
|
````csharp
|
||
|
|
AutoUpdater.SetOwner(yourMainFormOrWpfWindow);
|
||
|
|
````
|
||
|
|
|
||
|
|
### Set the TopMost property of all updater dialogs
|
||
|
|
|
||
|
|
To ensure that the dialogs displayed by the auto updater are always on top, you can set the "TopMost" to true, as
|
||
|
|
demonstrated in the code snippet below.
|
||
|
|
|
||
|
|
````csharp
|
||
|
|
AutoUpdater.TopMost = true;
|
||
|
|
````
|
||
|
|
|
||
|
|
### Change storage method of Remind Later and Skip options
|
||
|
|
|
||
|
|
You can change how AutoUpdater.NET saves the Remind Later and Skip values by assigning the PersistenceProvider. If you
|
||
|
|
don't provide a PersistenceProvider then it will save the values in Windows registry.
|
||
|
|
|
||
|
|
If you are using .NET 4.0 or above then you can use JsonFilePersistenceProvider instead of default
|
||
|
|
RegistryPersistenceProvider as shown below.
|
||
|
|
|
||
|
|
````csharp
|
||
|
|
string jsonPath = Path.Combine(Environment.CurrentDirectory, "settings.json");
|
||
|
|
AutoUpdater.PersistenceProvider = new JsonFilePersistenceProvider(jsonPath);
|
||
|
|
````
|
||
|
|
|
||
|
|
You can create your own PersistenceProvider by
|
||
|
|
implementing [IPersistenceProvider](https://github.com/ravibpatel/AutoUpdater.NET/blob/master/AutoUpdater.NET/IPersistenceProvider.cs)
|
||
|
|
interface.
|
||
|
|
|
||
|
|
## Check updates frequently
|
||
|
|
|
||
|
|
You can call Start method inside Timer to check for updates frequently.
|
||
|
|
|
||
|
|
### WinForms
|
||
|
|
|
||
|
|
````csharp
|
||
|
|
System.Timers.Timer timer = new System.Timers.Timer
|
||
|
|
{
|
||
|
|
Interval = 2 * 60 * 1000,
|
||
|
|
SynchronizingObject = this
|
||
|
|
};
|
||
|
|
timer.Elapsed += delegate
|
||
|
|
{
|
||
|
|
AutoUpdater.Start("https://rbsoft.org/updates/AutoUpdaterTest.xml");
|
||
|
|
};
|
||
|
|
timer.Start();
|
||
|
|
````
|
||
|
|
|
||
|
|
### WPF
|
||
|
|
|
||
|
|
````csharp
|
||
|
|
DispatcherTimer timer = new DispatcherTimer {Interval = TimeSpan.FromMinutes(2)};
|
||
|
|
timer.Tick += delegate
|
||
|
|
{
|
||
|
|
AutoUpdater.Start("https://rbsoft.org/updates/AutoUpdaterTestWPF.xml");
|
||
|
|
};
|
||
|
|
timer.Start();
|
||
|
|
````
|
||
|
|
|
||
|
|
## Handling Application exit logic manually
|
||
|
|
|
||
|
|
If you like to handle Application exit logic yourself then you can use ApplicationExitEvent like below. This is very
|
||
|
|
useful if you like to do something before closing the application.
|
||
|
|
|
||
|
|
````csharp
|
||
|
|
AutoUpdater.ApplicationExitEvent += AutoUpdater_ApplicationExitEvent;
|
||
|
|
|
||
|
|
private void AutoUpdater_ApplicationExitEvent()
|
||
|
|
{
|
||
|
|
Text = @"Closing application...";
|
||
|
|
Thread.Sleep(5000);
|
||
|
|
Application.Exit();
|
||
|
|
}
|
||
|
|
````
|
||
|
|
|
||
|
|
## Handling updates manually
|
||
|
|
|
||
|
|
Sometimes as a developer you need to maintain look and feel for the entire application similarly or you just need to do
|
||
|
|
something before update. In this type of scenarios you can handle the updates manually by subscribing to an event. You
|
||
|
|
can do it by adding following line with above code.
|
||
|
|
|
||
|
|
````csharp
|
||
|
|
AutoUpdater.CheckForUpdateEvent += AutoUpdaterOnCheckForUpdateEvent;
|
||
|
|
|
||
|
|
private void AutoUpdaterOnCheckForUpdateEvent(UpdateInfoEventArgs args)
|
||
|
|
{
|
||
|
|
if (args.Error == null)
|
||
|
|
{
|
||
|
|
if (args.IsUpdateAvailable)
|
||
|
|
{
|
||
|
|
DialogResult dialogResult;
|
||
|
|
if (args.Mandatory.Value)
|
||
|
|
{
|
||
|
|
dialogResult =
|
||
|
|
MessageBox.Show(
|
||
|
|
$@"There is new version {args.CurrentVersion} available. You are using version {args.InstalledVersion}. This is required update. Press Ok to begin updating the application.", @"Update Available",
|
||
|
|
MessageBoxButtons.OK,
|
||
|
|
MessageBoxIcon.Information);
|
||
|
|
}
|
||
|
|
else
|
||
|
|
{
|
||
|
|
dialogResult =
|
||
|
|
MessageBox.Show(
|
||
|
|
$@"There is new version {args.CurrentVersion} available. You are using version {
|
||
|
|
args.InstalledVersion
|
||
|
|
}. Do you want to update the application now?", @"Update Available",
|
||
|
|
MessageBoxButtons.YesNo,
|
||
|
|
MessageBoxIcon.Information);
|
||
|
|
}
|
||
|
|
|
||
|
|
// Uncomment the following line if you want to show standard update dialog instead.
|
||
|
|
// AutoUpdater.ShowUpdateForm(args);
|
||
|
|
|
||
|
|
if (dialogResult.Equals(DialogResult.Yes) || dialogResult.Equals(DialogResult.OK))
|
||
|
|
{
|
||
|
|
try
|
||
|
|
{
|
||
|
|
if (AutoUpdater.DownloadUpdate(args))
|
||
|
|
{
|
||
|
|
Application.Exit();
|
||
|
|
}
|
||
|
|
}
|
||
|
|
catch (Exception exception)
|
||
|
|
{
|
||
|
|
MessageBox.Show(exception.Message, exception.GetType().ToString(), MessageBoxButtons.OK,
|
||
|
|
MessageBoxIcon.Error);
|
||
|
|
}
|
||
|
|
}
|
||
|
|
}
|
||
|
|
else
|
||
|
|
{
|
||
|
|
MessageBox.Show(@"There is no update available please try again later.", @"No update available",
|
||
|
|
MessageBoxButtons.OK, MessageBoxIcon.Information);
|
||
|
|
}
|
||
|
|
}
|
||
|
|
else
|
||
|
|
{
|
||
|
|
if (args.Error is WebException)
|
||
|
|
{
|
||
|
|
MessageBox.Show(
|
||
|
|
@"There is a problem reaching update server. Please check your internet connection and try again later.",
|
||
|
|
@"Update Check Failed", MessageBoxButtons.OK, MessageBoxIcon.Error);
|
||
|
|
}
|
||
|
|
else
|
||
|
|
{
|
||
|
|
MessageBox.Show(args.Error.Message,
|
||
|
|
args.Error.GetType().ToString(), MessageBoxButtons.OK,
|
||
|
|
MessageBoxIcon.Error);
|
||
|
|
}
|
||
|
|
}
|
||
|
|
}
|
||
|
|
````
|
||
|
|
|
||
|
|
When you do this it will execute the code in above event when AutoUpdater.Start method is called instead of showing the
|
||
|
|
update dialog.
|
||
|
|
|
||
|
|
* IsUpdateAvailable (bool) : If update is available then returns true otherwise false.
|
||
|
|
* DownloadURL (string) : Download URL of the update file..
|
||
|
|
* ChangelogURL (string) : URL of the webpage specifying changes in the new update.
|
||
|
|
* CurrentVersion (Version) : Newest version of the application available to download.
|
||
|
|
* InstalledVersion (Version) : Version of the application currently installed on the user's PC.
|
||
|
|
* Mandatory (Mandatory) : Shows if the update is required or optional.
|
||
|
|
|
||
|
|
## Handling parsing logic manually
|
||
|
|
|
||
|
|
If you want to use other format instead of XML as an AppCast file then you need to handle the parsing logic by
|
||
|
|
subscribing to ParseUpdateInfoEvent. You can do it as follows.
|
||
|
|
|
||
|
|
````csharp
|
||
|
|
AutoUpdater.ParseUpdateInfoEvent += AutoUpdaterOnParseUpdateInfoEvent;
|
||
|
|
AutoUpdater.Start("https://rbsoft.org/updates/AutoUpdaterTest.json");
|
||
|
|
|
||
|
|
private void AutoUpdaterOnParseUpdateInfoEvent(ParseUpdateInfoEventArgs args)
|
||
|
|
{
|
||
|
|
dynamic json = JsonConvert.DeserializeObject(args.RemoteData);
|
||
|
|
args.UpdateInfo = new UpdateInfoEventArgs
|
||
|
|
{
|
||
|
|
CurrentVersion = json.version,
|
||
|
|
ChangelogURL = json.changelog,
|
||
|
|
DownloadURL = json.url,
|
||
|
|
Mandatory = new Mandatory
|
||
|
|
{
|
||
|
|
Value = json.mandatory.value,
|
||
|
|
UpdateMode = json.mandatory.mode,
|
||
|
|
MinimumVersion = json.mandatory.minVersion
|
||
|
|
},
|
||
|
|
CheckSum = new CheckSum
|
||
|
|
{
|
||
|
|
Value = json.checksum.value,
|
||
|
|
HashingAlgorithm = json.checksum.hashingAlgorithm
|
||
|
|
}
|
||
|
|
};
|
||
|
|
}
|
||
|
|
````
|
||
|
|
|
||
|
|
### JSON file used in the Example above
|
||
|
|
|
||
|
|
````json
|
||
|
|
{
|
||
|
|
"version":"2.0.0.0",
|
||
|
|
"url":"https://rbsoft.org/downloads/AutoUpdaterTest.zip",
|
||
|
|
"changelog":"https://github.com/ravibpatel/AutoUpdater.NET/releases",
|
||
|
|
"mandatory":{
|
||
|
|
"value":true,
|
||
|
|
"minVersion": "2.0.0.0",
|
||
|
|
"mode":1
|
||
|
|
},
|
||
|
|
"checksum":{
|
||
|
|
"value":"E5F59E50FC91A9E52634FFCB11F32BD37FE0E2F1",
|
||
|
|
"hashingAlgorithm":"SHA1"
|
||
|
|
}
|
||
|
|
}
|
||
|
|
````
|
||
|
|
|
||
|
|
## Steps to build it for further development
|
||
|
|
|
||
|
|
You can follow below steps to build the project on your local development environment.
|
||
|
|
|
||
|
|
* Disable signing from project properties of both AutoUpdater.NET and ZipExtractor.
|
||
|
|
* Edit both .csproj file of AutoUpdater.NET and ZipExtractor and change following line. Use .NET version you prefer.
|
||
|
|
|
||
|
|
Before
|
||
|
|
|
||
|
|
```xml
|
||
|
|
<TargetFrameworks>net462;netcoreapp3.1;net5.0-windows</TargetFrameworks>
|
||
|
|
```
|
||
|
|
|
||
|
|
After
|
||
|
|
|
||
|
|
```xml
|
||
|
|
<TargetFramework>net5.0-windows</TargetFramework>
|
||
|
|
```
|
||
|
|
|
||
|
|
* Build ZipExtractor project in "Release" configuration to create the executable in Resources folder. While compiling it
|
||
|
|
for .NET Core 3.1 or above, you have to use publish command instead of build as
|
||
|
|
shown [here](https://learn.microsoft.com/en-us/dotnet/core/tutorials/publishing-with-visual-studio?pivots=dotnet-7-0)
|
||
|
|
and copy the resulting executable to "AutoUpdater.NET/Resources" folder.
|
||
|
|
* Visual Studio 2022 doesn't allow building .NET Framework 4.5 by default, so if you are using Visual Studio 2022 then
|
||
|
|
you can just change it to any supported .NET version, or you have to follow steps
|
||
|
|
from [here](https://stackoverflow.com/a/70109092/1273550) to use .NET Framework 4.5.
|

